マットプロットリブ は Python のライブラリであり、NumPy ライブラリの数値数学的拡張機能です。 パイプロット は、MATLAB のようなインターフェイスを提供する Matplotlib モジュールへの状態ベースのインターフェイスです。
Matplotlib ヒストグラム
ヒストグラムは、いくつかのグループの形式で提供されるデータを表すために使用されます。これは、数値データの分布をグラフで表現するための正確な方法です。これは棒グラフの一種で、X 軸がビンの範囲を表し、Y 軸が周波数に関する情報を示します。 Python の Matplotlib ライブラリは、Pyplot を使用してヒストグラムを作成する簡単な方法を提供します。
文字列を文字Javaに変換します
Matplotlib pyplot.hist() の構文
Pythonで hist() 関数 Matplotlib ライブラリの pyplot 内の は、ヒストグラムをプロットするために使用されます。
構文: matplotlib.pyplot.hist(x, bins=None, range=None,density=False,weights=None,cumulative=False,bottom=None, histtype='bar', align='mid', Orientation='vertical', rwidth=None、log=False、color=None、label=None、stacked=False、*、data=None、**kwargs)
パラメーター: このメソッドは、以下で説明するパラメータを受け入れます。
x : このパラメータはデータのシーケンスです。 bins : このパラメータはオプションのパラメータであり、整数、シーケンス、または文字列が含まれます。 range : このパラメータはオプションのパラメータであり、ビンの下限範囲と上限範囲を表します。 density : このパラメータはオプションのパラメータであり、ブール値が含まれます。 Weights : このパラメータはオプションのパラメータであり、x と同じ形状の重みの配列です。 Bottom : このパラメータは、各ビンの下部ベースラインの位置です。 histtype : このパラメータはオプションのパラメータで、ヒストグラムのタイプを描画するために使用されます。 {‘bar’, ‘barstacked’, ‘step’, ‘stepfilled’} align : このパラメーターはオプションのパラメーターであり、ヒストグラムのプロット方法を制御します。 {'left', 'mid', 'right'} rwidth : このパラメータはオプションのパラメータであり、ビン幅の一部としてのバーの相対的な幅です。 log : このパラメータはオプションのパラメータであり、次の目的で使用されます。ヒストグラムの軸を対数スケールの色に設定する : このパラメーターはオプションのパラメーターであり、データセットごとに 1 つのカラー仕様またはカラー仕様のシーケンスです。 label : このパラメータはオプションのパラメータであり、複数のデータセットに一致する文字列または文字列のシーケンスです。 Normed : このパラメータはオプションのパラメータであり、ブール値が含まれます。代わりに、density キーワード引数を使用します。
戻り値: これは以下を返します
n : ヒストグラム ビンの値を返します。 bins : ビンのエッジを返します。 patches : ヒストグラムの作成に使用された個々のパッチのリストを返します。
Matplotlib でヒストグラムを作成する
Python で Matplotlib ライブラリを使用すると、さまざまなタイプのヒストグラムを作成できます。 hist() 関数の機能をよりよく理解するために、いくつかの例を見てみましょう。
例 1:
この例では、デフォルトのパラメーターを指定した hist() 関数を使用して単純なヒストグラムを作成します。 「デフォルトパラメータ」という用語は、データをパラメータとして Matplotlib の hist() 関数に渡すだけであり、他のパラメータはすべてデフォルト値を取得することを意味します。
Python3
# import module> import> matplotlib.pyplot as plt> # create data> data>=> [>32>,>96>,>45>,>67>,>76>,>28>,>79>,>62>,>43>,>81>,>70>,> >61>,>95>,>44>,>60>,>69>,>71>,>23>,>69>,>54>,>76>,>67>,> >82>,>97>,>26>,>34>,>18>,>16>,>59>,>88>,>29>,>30>,>66>,> >23>,>65>,>72>,>20>,>78>,>49>,>73>,>62>,>87>,>37>,>68>,> >81>,>80>,>77>,>92>,>81>,>52>,>43>,>68>,>71>,>86>]> # create histogram> plt.hist(data)> # display histogram> plt.show()> |
>
100の10は何ですか
>
出力:
デフォルトパラメータを使用した hist() によるヒストグラム
例 2:
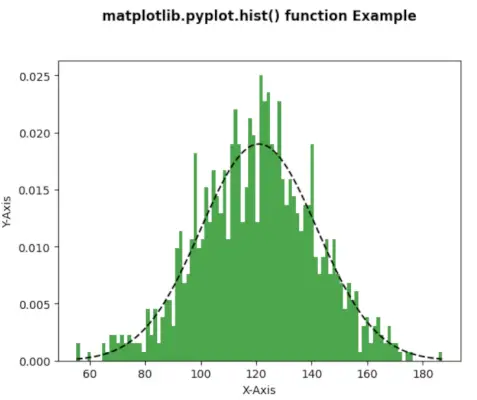
この例では、Matplotlib の hist() 関数を使用してヒストグラムを作成し、ビン、色、密度などの必要なパラメーターを渡します。また、pyplot.plot() 関数を使用して、グラフ上に破線をプロットしました。
Python3
# Implementation of matplotlib function> import> matplotlib> import> numpy as np> import> matplotlib.pyplot as plt> > np.random.seed(>10>*>*>7>)> mu>=> 121> sigma>=> 21> x>=> mu>+> sigma>*> np.random.randn(>1000>)> > num_bins>=> 100> > n, bins, patches>=> plt.hist(x, num_bins,> >density>=> 1>,> >color>=>'green'>,> >alpha>=> 0.7>)> > y>=> ((>1> /> (np.sqrt(>2> *> np.pi)>*> sigma))>*> >np.exp(>->0.5> *> (>1> /> sigma>*> (bins>-> mu))>*>*>2>))> plt.plot(bins, y,>'--'>, color>=>'black'>)> plt.xlabel(>'X-Axis'>)> plt.ylabel(>'Y-Axis'>)> plt.title(>'matplotlib.pyplot.hist() function Example
'>,> >fontweight>=> 'bold'>)> plt.show()> |
>
>
出力:
matplotlib.pyplot.hist() 関数を使用した単純なヒストグラム
.netチュートリアル
例 3:
この例では、matplotlib.pyplot.hist() 関数を使用して、さまざまな属性を持つヒストグラムを作成します。ヒストグラムバーのバーに特定の色のセットを定義します。
Python3
SVNチェックアウトとは何ですか
# Implementation of matplotlib function> import> matplotlib> import> numpy as np> import> matplotlib.pyplot as plt> > np.random.seed(>10>*>*>7>)> n_bins>=> 20> x>=> np.random.randn(>10000>,>3>)> > colors>=> [>'green'>,>'blue'>,>'lime'>]> plt.hist(x, n_bins, density>=> True>,> >histtype>=>'bar'>,> >color>=> colors,> >label>=> colors)> plt.legend(prop>=>{>'size'>:>10>})> plt.title(>'matplotlib.pyplot.hist() function Example
'>,> >fontweight>=> 'bold'>)> plt.show()> |
>
>
出力:
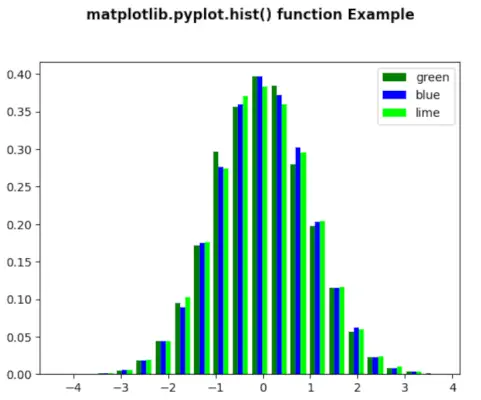
matplotlib.pyplot.hist() 関数を使用したヒストグラム