ポインタはアドレスの記号表現です。これらにより、プログラムは参照による呼び出しをシミュレートしたり、動的なデータ構造を作成および操作したりすることができます。配列またはその他のデータ構造内の要素を反復処理することは、ポインターの主な用途の 1 つです。
操作している変数のアドレスは、同じデータ型 (int や string など) を指すポインタ変数に割り当てられます。
ブースアルゴリズム
構文:
datatype *var_name; int *ptr; // ptr can point to an address which holds int data>
ポインタの使い方は?
- ポインタ変数を定義する
- 単項演算子 (&) を使用して変数のアドレスをポインターに代入し、その変数のアドレスを返します。
- 単項演算子 (*) を使用して、アドレスに格納されている値にアクセスし、オペランドで指定されたアドレスにある変数の値を返します。
データ型をポインターに関連付ける理由は次のとおりです。 データが何バイト保存されているかを知っていること 。ポインターをインクリメントするときは、ポインターが指すデータ型のサイズだけポインターを増やします。
 C++
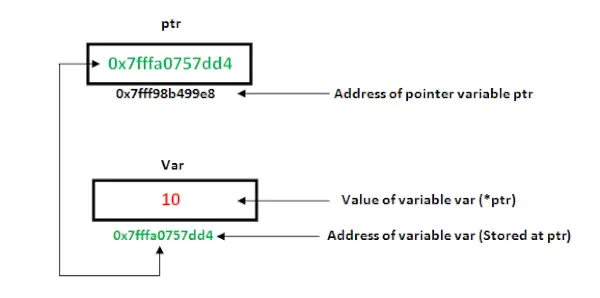
C++ // C++ program to illustrate Pointers #include using namespace std; void geeks() { int var = 20; // declare pointer variable int* ptr; // note that data type of ptr and var must be same ptr = &var; // assign the address of a variable to a pointer cout << 'Value at ptr = ' << ptr << '
'; cout << 'Value at var = ' << var << '
'; cout << 'Value at *ptr = ' << *ptr << '
'; } // Driver program int main() { geeks(); return 0; }> 出力
Value at ptr = 0x7ffe454c08cc Value at var = 20 Value at *ptr = 20>
参考文献とポインタ
C++ 引数を関数に渡すには 3 つの方法があります。
- 値による呼び出し
- ポインター引数を使用した参照による呼び出し
- 参照引数を使用した参照による呼び出し
 // C++ program to illustrate call-by-methods #include  using namespace std; // Pass-by-Value int square1(int n) {  // Address of n in square1() is not the same as n1 in  // main()  cout << 'address of n1 in square1(): ' << &n << '
';  // clone modified inside the function  n *= n;  return n; } // Pass-by-Reference with Pointer Arguments void square2(int* n) {  // Address of n in square2() is the same as n2 in main()  cout << 'address of n2 in square2(): ' << n << '
';  // Explicit de-referencing to get the value pointed-to  *n *= *n; } // Pass-by-Reference with Reference Arguments void square3(int& n) {  // Address of n in square3() is the same as n3 in main()  cout << 'address of n3 in square3(): ' << &n << '
';  // Implicit de-referencing (without '*')  n *= n; } void geeks() {  // Call-by-Value  int n1 = 8;  cout << 'address of n1 in main(): ' << &n1 << '
';  cout << 'Square of n1: ' << square1(n1) << '
';  cout << 'No change in n1: ' << n1 << '
';  // Call-by-Reference with Pointer Arguments  int n2 = 8;  cout << 'address of n2 in main(): ' << &n2 << '
';  square2(&n2);  cout << 'Square of n2: ' << n2 << '
';  cout << 'Change reflected in n2: ' << n2 << '
';  // Call-by-Reference with Reference Arguments  int n3 = 8;  cout << 'address of n3 in main(): ' << &n3 << '
';  square3(n3);  cout << 'Square of n3: ' << n3 << '
';  cout << 'Change reflected in n3: ' << n3 << '
'; } // Driver program int main() { geeks(); }>
出力
address of n1 in main(): 0x7fffa7e2de64 address of n1 in square1(): 0x7fffa7e2de4c Square of n1: 64 No change in n1: 8 address of n2 in main(): 0x7fffa7e2de68 address of n2 in square2(): 0x7fffa7e2de68 Square of n2: 64 Change reflected in n2: 64 address of n3 in main(): 0x7fffa7e2de6c address of n3 in square3(): 0x7fffa7e2de6c Square of n3: 64 Change reflected in n3: 64>
C++ では、デフォルトでは引数は値によって渡され、呼び出された関数で行われた変更は渡された変数には反映されません。変更は、呼び出された関数によって作成されたクローンに行われます。元のコピーを直接変更したい場合 (特に巨大なオブジェクトや配列を渡す場合)、および/またはクローン作成のオーバーヘッドを回避したい場合は、参照渡しを使用します。参照引数を使用した参照渡しでは、参照および参照解除のための厄介な構文は必要ありません。
- C の関数ポインター
- 関数へのポインタ
ポインタとしての配列名
アン 配列 name には、定数ポインタのように機能する配列の最初の要素のアドレスが含まれます。つまり、配列名に格納されているアドレスは変更できません。たとえば、val という名前の配列がある場合、 ヴァル そして &val[0] 相互に交換して使用できます。
C++ // C++ program to illustrate Array Name as Pointers #include using namespace std; void geeks() { // Declare an array int val[3] = { 5, 10, 20 }; // declare pointer variable int* ptr; // Assign the address of val[0] to ptr // We can use ptr=&val[0];(both are same) ptr = val; cout << 'Elements of the array are: '; cout << ptr[0] << ' ' << ptr[1] << ' ' << ptr[2]; } // Driver program int main() { geeks(); }> 出力
Elements of the array are: 5 10 20>

ポインタ ptr が引数として関数に送信される場合、配列 val には同様の方法でアクセスできます。 ポインタと配列
ポインタ式とポインタ演算
の限定セット 算術 操作は、次のポインターに対して実行できます。
- インクリメント ( ++ )
- デクリメント ( — )
- 整数をポインタに追加できます ( + または += )
- ポインタ ( – または -= ) から整数を減算できます。
- 2 つのポインターの差 (p1-p2)
( 注記: ポインタ演算は配列に対して実行されない限り意味がありません。)
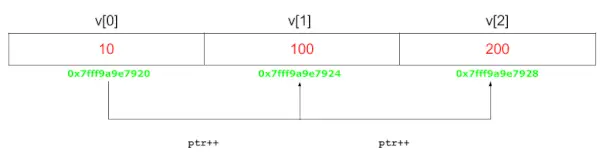
C++ // C++ program to illustrate Pointer Arithmetic #include using namespace std; void geeks() { // Declare an array int v[3] = { 10, 100, 200 }; // declare pointer variable int* ptr; // Assign the address of v[0] to ptr ptr = v; for (int i = 0; i < 3; i++) { cout << 'Value at ptr = ' << ptr << '
'; cout << 'Value at *ptr = ' << *ptr << '
'; // Increment pointer ptr by 1 ptr++; } } // Driver program int main() { geeks(); }> 出力
Value at ptr = 0x7ffe5a2d8060 Value at *ptr = 10 Value at ptr = 0x7ffe5a2d8064 Value at *ptr = 100 Value at ptr = 0x7ffe5a2d8068 Value at *ptr = 200>
高度なポインタ表記法
2 次元数値配列のポインタ表記を考慮してください。次の宣言を考えてみましょう
int nums[2][3] = { { 16, 18, 20 }, { 25, 26, 27 } };>一般に、nums[ i ][ j ] は *(*(nums+i)+j) と同等です。
複数のテーブルSQLから選択

ポインターと文字列リテラル
文字列リテラルは、NULL で終了する文字シーケンスを含む配列です。文字列リテラルは、文字型と終端の null 文字の配列であり、各要素は型 const char です (文字列の文字は変更できないため)。
選択範囲の並べ替え
>
これは geek のリテラル表現を持つ配列を宣言し、その最初の要素へのポインターが ptr に割り当てられます。 geek がアドレス 1800 から始まるメモリ位置に格納されていると想像すると、前の宣言は次のように表すことができます。

ポインターと配列は式内で同じように動作するため、ptr を使用して文字列リテラルの文字にアクセスできます。例えば:
char ptr = 0; char x = *(ptr+3); char y = ptr[3];>
ここで、x と y の両方には、1803 (1800+3) に格納された k が含まれています。
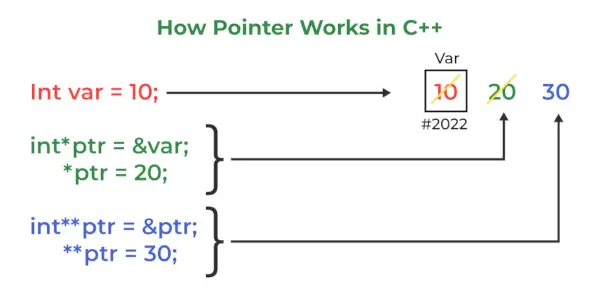
ポインタからポインタへ
C++ では、データまたは別のポインターを指すポインターへのポインターを作成できます。この構文では、ポインターの宣言時に間接レベルごとに単項演算子 (*) が必要になるだけです。
char a; char *b; char ** c; a = ’g’; b = &a; c = &b;>
ここで、b は「g」を格納する char を指し、c はポインタ b を指します。
ボイドポインター
これは、型の不在を表す、C++ で使用できる特別な型のポインターです。 ボイドポインタ 型を持たない値 (したがって、長さおよび参照解除プロパティも未定) を指すポインタです。これは、void ポインターがあらゆるデータ型を指すことができるため、非常に柔軟であることを意味します。この柔軟性にはメリットがあります。これらのポインターを直接逆参照することはできません。これらは、逆参照される前に、まず具体的なデータ型を指す他のポインタ型に変換する必要があります。
C++ // C++ program to illustrate Void Pointer #include using namespace std; void increase(void* data, int ptrsize) { if (ptrsize == sizeof(char)) { char* ptrchar; // Typecast data to a char pointer ptrchar = (char*)data; // Increase the char stored at *ptrchar by 1 (*ptrchar)++; cout << '*data points to a char' << '
'; } else if (ptrsize == sizeof(int)) { int* ptrint; // Typecast data to a int pointer ptrint = (int*)data; // Increase the int stored at *ptrchar by 1 (*ptrint)++; cout << '*data points to an int' << '
'; } } void geek() { // Declare a character char c = 'x'; // Declare an integer int i = 10; // Call increase function using a char and int address // respectively increase(&c, sizeof(c)); cout << 'The new value of c is: ' << c << '
'; increase(&i, sizeof(i)); cout << 'The new value of i is: ' << i << '
'; } // Driver program int main() { geek(); }> 出力
*data points to a char The new value of c is: y *data points to an int The new value of i is: 11>
無効なポインタ
ポインタは有効なアドレスを指す必要がありますが、必ずしも有効な要素 (配列の場合など) を指す必要はありません。これらは無効なポインタと呼ばれます。初期化されていないポインタも無効なポインタです。
int *ptr1; int arr[10]; int *ptr2 = arr+20;>
ここで、ptr1 は初期化されていないため無効なポインタとなり、ptr2 は arr の範囲外であるため無効なポインタになります。 (注: 無効なポインタが必ずしもコンパイル エラーを引き起こすわけではありません)
NULL ポインター
あ ヌルポインタ は、単なる無効なアドレスではなく、どこも指さないポインターです。ポインタを NULL として割り当てる 2 つの方法を次に示します。
int *ptr1 = 0; int *ptr2 = NULL;>
ポインタの利点
- ポインターによりコードが削減され、パフォーマンスが向上します。これらは、文字列、ツリー、配列、構造体、関数を取得するために使用されます。
- ポインターを使用すると、関数から複数の値を返すことができます。
- これに加えて、ポインタを使用すると、コンピュータのメモリ内の記憶場所にアクセスできます。
関連記事:
- 不透明なポインター
- 近く、遠く、巨大なポインター
クイズ:
Javaランダム数学ランダム
- ポインタの基本
- 高度なポインター