Python で Matplotlib を使用する場合、視覚化の外観と明瞭さは、情報を効果的に伝える上で重要な役割を果たします。 Matplotlib は、matplotlib の figsize をすべてのプロットに対してグローバルに、または特定の視覚化に対して個別に変更する簡単な方法を提供し、ユーザーがさまざまなアプリケーションやコンテキストに合わせてプロットを柔軟に最適化できるようにします。この記事では、図のサイズを変更する方法を説明します。 マットプロットリブ で パイソン 。
プロットにどのように使用しますか?
Matplotlib の主な目的は、データを表す図を作成することです。データの視覚化は、データを理解しやすい形式にまとめ、傾向や異常値を強調することでストーリーを伝えるために使用されます。 Figure には、軸、グラフ プロット、幾何学的形状など、さまざまなタイプのデータをすべて入力できます。グラフをプロットするとき、Figure のサイズを特定のサイズに設定したい場合があります。フィギュアのサイズを大きくしたり、高さを高くしたりすることができます。
Matplotlib のプロット サイズを増減する
これは、次の属性によって実現できます。 マットプロットリブ として知られている 図サイズ 。 figsize 属性を使用すると、Figure の幅と高さをインチ単位で指定できます。
Python matplotlib.pyplot figsize 構文
構文: plt.figure(figsize=(幅, 高さ))
パラメーター :
左結合と右結合
width>: 数字の幅 (インチ単位)。height>: フィギュアの高さ (インチ単位)。figsize 属性は、関数 Figure() のパラメーターです。これはオプションの属性であり、デフォルトでは、Figure の寸法は (6.4, 4.8) になります。これは、関数内で属性が指定されていない標準プロットです。
Matplotlib で Figsize を変更する
以下は、matplotlib で figsize を変更できる例です。
例1 : 図形サイズ引数を設定します
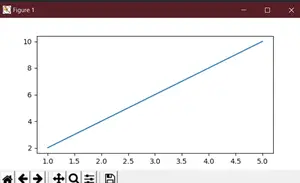
この例では、幅 6 インチ、高さ 3 インチの寸法の Matplotlib Figure が作成され、線形方程式 �=2� をプロットするために使用されます。 そして =2 バツ 。結果のグラフには、この方程式のプロットされた点が表示されます。
Python3
# We start by importing matplotlib> import> matplotlib.pyplot as plt> # Plotting a figure of width 6 and height 3> plt_1>=> plt.figure(figsize>=>(>6>,>3>))> # Let's plot the equation y=2*x> x>=> [>1>,>2>,>3>,>4>,>5>]> # y = [2,4,6,8,10]> y>=> [x>*>2> for> x>in> x]> # plt.plot() specifies the arguments for x-axis> # and y-axis to be plotted> plt.plot(x, y)> # To show this figure object, we use the line,> # fig.show()> plt.show()> |
>
>
出力:
これは、Jupiter ノートブック以外の Python IDE を使用している場合に機能します。 Jupiter ノートブックを使用している場合は、plt.show() は使用しません。代わりに、matplotlib をインポートした直後にコード内で %matplotlib inline を指定します。
例 2: Matplotlib で図のサイズを変更する
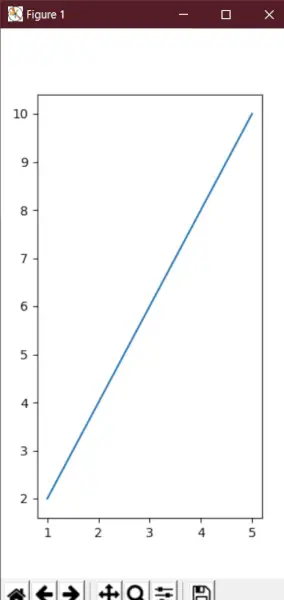
Matplotlib での Figure のサイズ変更の動的な性質を確認するには、次元を反転した Figure を作成する必要があります。高さは幅の 2 倍のサイズになります。
Python3
inttostr java
# We start by importing matplotlib> import> matplotlib.pyplot as plt> # Plotting a figure of width 3 and height 6> plt_1>=> plt.figure(figsize>=>(>3>,>6>))> # Let's plot the equation y=2*x> x>=> [>1>,>2>,>3>,>4>,>5>]> # y = [2,4,6,8,10]> y>=> [x>*>2> for> x>in> x]> # plt.plot() specifies the arguments for> # x-axis and y-axis to be plotted> plt.plot(x, y)> # To show this figure object, we use the line,> # fig.show()> plt.show()> |
>
>
出力:
例 3: Matplotlib で Figure の高さと幅を設定する
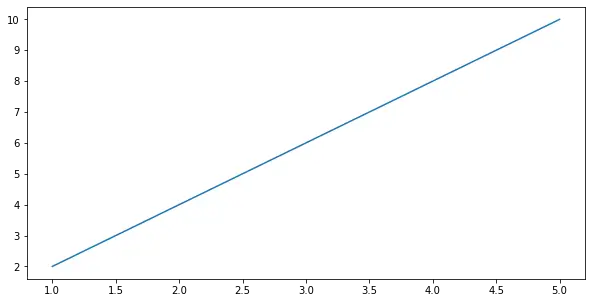
この例では、単に figsize を使用する代わりに、次のコマンドを使用してプロットの高さと幅を設定できることがわかります。 set_figheight() そして set_figwidth() 機能。
Python3
# We start by importing matplotlib> import> matplotlib.pyplot as plt> # Plotting a figure of width 10 and height 5> fig>=> plt.figure()> fig.set_figheight(>5>)> fig.set_figwidth(>10>)> # Let's plot the equation y=2*x> x>=> [>1>,>2>,>3>,>4>,>5>]> # y = [2,4,6,8,10]> y>=> [x>*>2> for> x>in> x]> # plt.plot() specifies the arguments for x-axis> # and y-axis to be plotted> plt.plot(x, y)> # To show this figure object, we use the line,> # fig.show()> plt.show()> |
>
>
出力:
例 4: Figure の高さと幅をインチ単位で設定する
ここでは、次を使用してフィギュアのサイズをインチ単位で設定する別の例を見ていきます。 set_size_inches 。
Python3
# We start by importing matplotlib> import> matplotlib.pyplot as plt> # Plotting a figure of width 5 and height 5> fig>=> plt.figure()> fig.set_size_inches(>5>,>5>)> # Let's plot the equation y=2*x> x>=> [>1>,>2>,>3>,>4>,>5>]> # y = [2,4,6,8,10]> y>=> [x>*>2> for> x>in> x]> # plt.plot() specifies the arguments for x-axis> # and y-axis to be plotted> plt.plot(x, y)> # To show this figure object, we use the line,> # fig.show()> plt.show()> |
文字列にキャストします
>
>
出力: