棒プロットまたは棒グラフは、長さと高さが表す値に比例する長方形の棒でデータのカテゴリを表すグラフです。棒グラフは水平方向または垂直方向にプロットできます。棒グラフは、個別のカテゴリ間の比較を示します。プロットの軸の 1 つは比較される特定のカテゴリを表し、もう 1 つの軸はそれらのカテゴリに対応する測定値を表します。
棒グラフの作成
の マットプロットライブラリ Python の API は、MATLAB スタイルの使用またはオブジェクト指向 API として使用できる bar() 関数を提供します。軸で使用される bar() 関数の構文は次のとおりです。
plt.bar(x, height, width, bottom, align)>
この関数は、指定されたパラメーターに応じて、四角形で囲まれた棒グラフを作成します。以下は、教育機関のさまざまなコースに登録している学生の数を表す棒グラフの簡単な例です。
Python3
import> numpy as np> import> matplotlib.pyplot as plt> > # creating the dataset> data>=> {>'C'>:>20>,>'C++'>:>15>,>'Java'>:>30>,> >'Python'>:>35>}> courses>=> list>(data.keys())> values>=> list>(data.values())> > fig>=> plt.figure(figsize>=> (>10>,>5>))> # creating the bar plot> plt.bar(courses, values, color>=>'maroon'>,> >width>=> 0.4>)> plt.xlabel(>'Courses offered'>)> plt.ylabel(>'No. of students enrolled'>)> plt.title(>'Students enrolled in different courses'>)> plt.show()> |
>
複数のテーブルSQLから選択
>
出力-
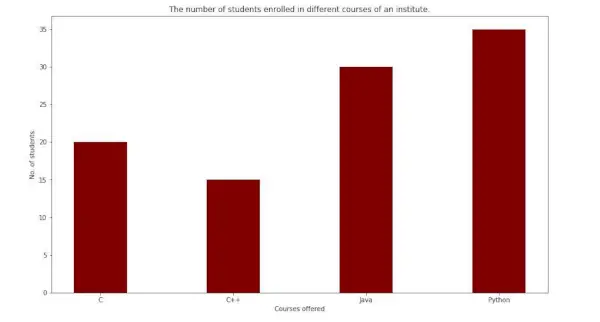
ここで、 plt.bar(courses,values, color=’maroon’) は、コース列を X 軸として使用し、値を Y 軸として使用して棒グラフをプロットすることを指定するために使用されます。 color 属性は、バーの色 (この場合は栗色) を設定するために使用されます。plt.xlabel(提供されているコース) と plt.ylabel(登録された学生) は、対応する axes にラベルを付けるために使用されます。plt.title() は、次の目的で使用されます。 make a title forgraph.plt.show() は、前のコマンドを使用して出力としてグラフを表示するために使用されます。
棒グラフのカスタマイズ
Python3
import> pandas as pd> from> matplotlib>import> pyplot as plt> # Read CSV into pandas> data>=> pd.read_csv(r>'cars.csv'>)> data.head()> df>=> pd.DataFrame(data)> name>=> df[>'car'>].head(>12>)> price>=> df[>'price'>].head(>12>)> # Figure Size> fig>=> plt.figure(figsize>=>(>10>,>7>))> # Horizontal Bar Plot> plt.bar(name[>0>:>10>], price[>0>:>10>])> # Show Plot> plt.show()> |
>
FCF
>
出力:

上の棒グラフでは、X 軸の目盛りが互いに重なっているため、正しく見ることができないことがわかります。したがって、X 軸の目盛りを回転させると、はっきりと見ることができます。このため、棒グラフのカスタマイズが必要になります。
Python3
スイッチケースJava
import> pandas as pd> from> matplotlib>import> pyplot as plt> # Read CSV into pandas> data>=> pd.read_csv(r>'cars.csv'>)> data.head()> df>=> pd.DataFrame(data)> name>=> df[>'car'>].head(>12>)> price>=> df[>'price'>].head(>12>)> # Figure Size> fig, ax>=> plt.subplots(figsize>=>(>16>,>9>))> # Horizontal Bar Plot> ax.barh(name, price)> # Remove axes splines> for> s>in> [>'top'>,>'bottom'>,>'left'>,>'right'>]:> >ax.spines[s].set_visible(>False>)> # Remove x, y Ticks> ax.xaxis.set_ticks_position(>'none'>)> ax.yaxis.set_ticks_position(>'none'>)> # Add padding between axes and labels> ax.xaxis.set_tick_params(pad>=> 5>)> ax.yaxis.set_tick_params(pad>=> 10>)> # Add x, y gridlines> ax.grid(b>=> True>, color>=>'grey'>,> >linestyle>=>'-.'>, linewidth>=> 0.5>,> >alpha>=> 0.2>)> # Show top values> ax.invert_yaxis()> # Add annotation to bars> for> i>in> ax.patches:> >plt.text(i.get_width()>+>0.2>, i.get_y()>+>0.5>,> >str>(>round>((i.get_width()),>2>)),> >fontsize>=> 10>, fontweight>=>'bold'>,> >color>=>'grey'>)> # Add Plot Title> ax.set_title(>'Sports car and their price in crore'>,> >loc>=>'left'>, )> # Add Text watermark> fig.text(>0.9>,>0.15>,>'Jeeteshgavande30'>, fontsize>=> 12>,> >color>=>'grey'>, ha>=>'right'>, va>=>'bottom'>,> >alpha>=> 0.7>)> # Show Plot> plt.show()> |
>
>
出力:

棒グラフにはさらに多くのカスタマイズが可能です。
複数の棒グラフ
複数の棒グラフは、1 つの変数が変化しているときにデータセット間の比較を行う場合に使用されます。これを積み上げ面棒グラフとして簡単に変換でき、各サブグループが他のサブグループの上に 1 つずつ表示されます。バーの太さや位置を変えることでプロットできます。次の棒グラフは、工学部門に合格した学生の数を示しています。
Python3
スタックJava
import> numpy as np> import> matplotlib.pyplot as plt> # set width of bar> barWidth>=> 0.25> fig>=> plt.subplots(figsize>=>(>12>,>8>))> # set height of bar> IT>=> [>12>,>30>,>1>,>8>,>22>]> ECE>=> [>28>,>6>,>16>,>5>,>10>]> CSE>=> [>29>,>3>,>24>,>25>,>17>]> # Set position of bar on X axis> br1>=> np.arange(>len>(IT))> br2>=> [x>+> barWidth>for> x>in> br1]> br3>=> [x>+> barWidth>for> x>in> br2]> # Make the plot> plt.bar(br1, IT, color>=>'r'>, width>=> barWidth,> >edgecolor>=>'grey'>, label>=>'IT'>)> plt.bar(br2, ECE, color>=>'g'>, width>=> barWidth,> >edgecolor>=>'grey'>, label>=>'ECE'>)> plt.bar(br3, CSE, color>=>'b'>, width>=> barWidth,> >edgecolor>=>'grey'>, label>=>'CSE'>)> # Adding Xticks> plt.xlabel(>'Branch'>, fontweight>=>'bold'>, fontsize>=> 15>)> plt.ylabel(>'Students passed'>, fontweight>=>'bold'>, fontsize>=> 15>)> plt.xticks([r>+> barWidth>for> r>in> range>(>len>(IT))],> >[>'2015'>,>'2016'>,>'2017'>,>'2018'>,>'2019'>])> plt.legend()> plt.show()> |
>
>
出力:
積み上げ棒グラフ
積み上げ棒グラフは、異なるグループを重ねて表します。バーの高さは、グループの結果を組み合わせた結果の高さに依存します。ゼロから値に進むのではなく、下から値に進みます。次の棒グラフは、チーム内の男子と女子の貢献度を表しています。
Python3
import> numpy as np> import> matplotlib.pyplot as plt> N>=> 5> boys>=> (>20>,>35>,>30>,>35>,>27>)> girls>=> (>25>,>32>,>34>,>20>,>25>)> boyStd>=> (>2>,>3>,>4>,>1>,>2>)> girlStd>=> (>3>,>5>,>2>,>3>,>3>)> ind>=> np.arange(N)> width>=> 0.35> fig>=> plt.subplots(figsize>=>(>10>,>7>))> p1>=> plt.bar(ind, boys, width, yerr>=> boyStd)> p2>=> plt.bar(ind, girls, width,> >bottom>=> boys, yerr>=> girlStd)> plt.ylabel(>'Contribution'>)> plt.title(>'Contribution by the teams'>)> plt.xticks(ind, (>'T1'>,>'T2'>,>'T3'>,>'T4'>,>'T5'>))> plt.yticks(np.arange(>0>,>81>,>10>))> plt.legend((p1[>0>], p2[>0>]), (>'boys'>,>'girls'>))> plt.show()> |
>
行と列
>
出力-
